Pre press is the process of preparing your artwork for production, printing / binding / finishing. It includes a range of checks which ensure the final print is correct. Errors during the print process can be costly, so a thorough pre press check can ensure minimal issues arise once production has started and helps to ensure your job looks the best it can.
Proof reading
The first and most importantly, proofread. Check (and have someone else check!) that there are no spelling or number errors in your design. This is the most common reason for having to reprint a job, so proofreading your job thoroughly is really important.
The document is the wrong size
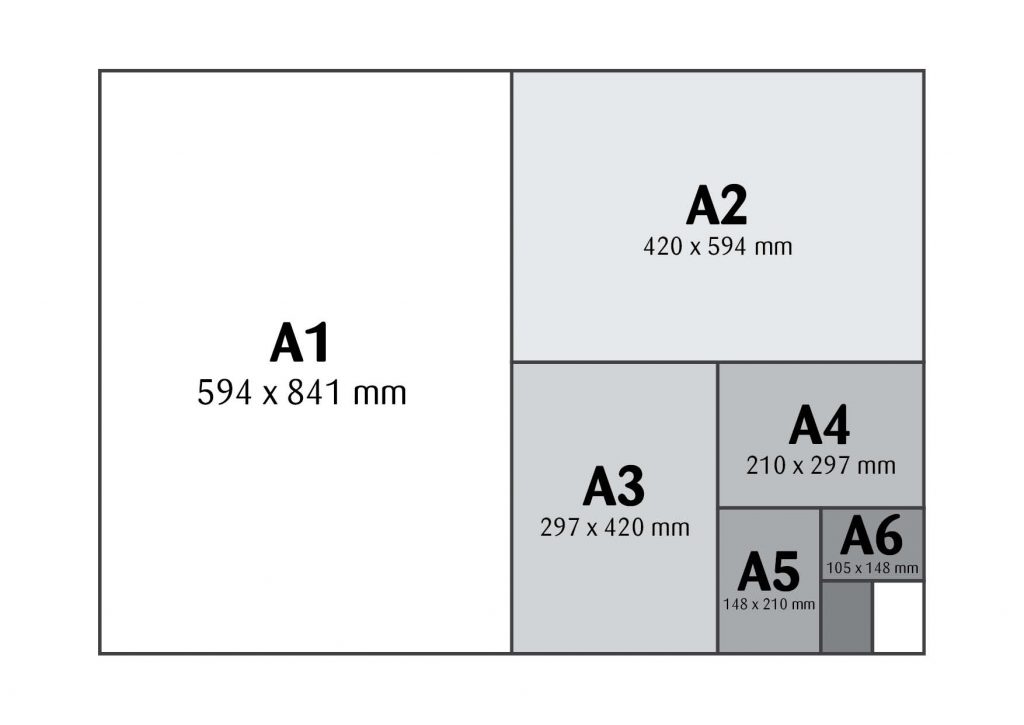
Next, you need to have your artwork sized properly. The sizing should be very specific e.g. An A4 flyer will be 210 x 297mm or a A5 flyer will be 148 x 210mm. Custom sizing is available but for more information on standard print sizes, see our basic sizing guide below.

The file doesn’t have bleed
If you have pictures on you design reaching the edge of the print, you will need to include bleed. Alternately, you can leave a white boarder around your design.
Bleed refers to extra print beyond the trim area of your printed design. Bleed is usually 3mm on all sides making the final size of an A4 210 x 297mm page actually 216 x 303mm.
The design is printed on over-sized paper then cut down to size with the appearance that the image is “bleeding” off the edge of the paper. Your printed design will look neat and tidy and the print will go the very edge of the page. Check out our illustrated guide here!
Type too close to the edge
When creating your file it’s important that your type isn’t too close to the edge of the document. We recommend having a minimum 5mm but ideally 10mm safe area before the edge of the page to ensure the type won’t be trimmed off when the paper goes through the guillotine.
The pictures are blurry
Sometimes your file can look great on your computer screen and when you receive your printed job, the pictures are blurry and pixilated. How annoying! This occurs because your computer screen and a printing press run at different resolutions. Your computer and websites use 72 ppi whilst the recommended resolution for printing is 300ppi when placed in your document at 100% (So enlarging a photo to 200% will half its resolution).
To see roughly how your pictures will print, we recommend doing the zoom test! Create a High resolution PDF (find out how here) Zoom into your pictures and logos 300%. If they look pixilated and low quality, they will likely look this way when printed. If they look ok, you’re good to go!
Tips to having sharp high quality prints
- Don’t use logos and photos that are made for websites
- Use a eps or ai logo files – your designer would have supplied you with these.
- Don’t use photos that have been compressed through emailing, try to source the original files.
